
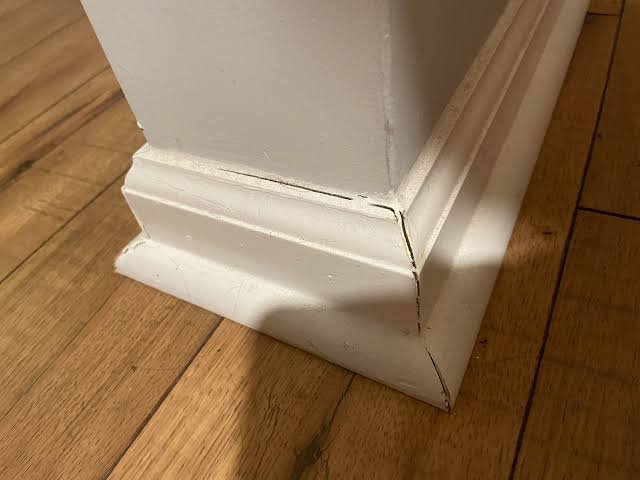
A loose baseboard can be annoying, especially when only one small section has pulled away from the wall. You may notice a gap along the top edge, hear a slight creak when you walk past it, or see the trim move when you press it. Fortunately, a loose baseboard does not usually mean the entire piece has to be removed.
In many cases, you can repair the loose section in place by first finding out why it has separated, then securing it with the right fastener or adhesive. The best method depends on what is behind the trim, how much of the baseboard is loose, and whether the wall or flooring has moved.
The key is not to simply push the trim against the wall and cover the gap with caulk. That may make it look better temporarily, but the baseboard can separate again if the underlying problem is not addressed.
Why Does a Baseboard Become Loose?
Baseboards can loosen for several different reasons. The trim may have been installed with too few nails, a nail may have missed the framing behind the drywall, or the wall and flooring may have shifted slightly over time.
Another common issue is movement in the materials themselves. Wood trim can expand and contract as temperature and humidity change. In a room with noticeable seasonal changes, small movements can eventually loosen a fastening point.
Sometimes the problem is much simpler. A baseboard may have been disturbed while furniture was moved, vacuumed, or installed, leaving one end or section slightly detached from the wall.
Before repairing it, press gently on different parts of the baseboard. Watch where it moves.
If only a short section moves while the rest remains firmly attached, a localized repair is usually possible. If the entire length is pulling away, the problem may require a more extensive repair.
Check the Baseboard Before You Repair It
Start by examining the loose section in good light.
Look at the top edge where the baseboard meets the wall. Is there a small, even gap, or is the wall itself damaged? Also check the bottom edge near the floor.
A small gap with an otherwise solid wall often points to movement or a loose fastening point. A damaged or crumbling wall surface is different. In that situation, simply adding another nail may not hold because the material around the fastening point cannot provide enough support.
Look for signs of moisture as well. Discoloration, swelling, soft wood, peeling paint, or repeated separation can indicate a water problem.
Do not repair a baseboard over an active moisture problem. Fixing the visible trim without dealing with the source can lead to another failed repair.
Check Whether the Trim Is Damaged
Run your fingers gently along the loose section.
If the baseboard feels solid and only moves toward and away from the wall, it may simply need to be secured again.
If the trim is cracked, badly warped, swollen, or broken, fastening it back into place may not produce a good result. A small damaged area can sometimes be repaired, but severely damaged trim may eventually need replacement.
Check the Wall Surface
Look closely at the wall behind the gap.
If the drywall is intact and firm, you have more options. If the drywall paper is torn, the surface is crumbling, or the area has been repeatedly patched, a normal nail or brad may not hold well.
This distinction matters because the fastener needs something solid enough to resist the movement of the baseboard.
What You Need
For a typical small repair, you may need:
- A small pry bar or trim-removal tool
- A hammer or suitable nailer
- Finishing nails or brad nails appropriate for the trim
- A nail set if using nails with heads that need to be recessed
- Paintable caulk
- Lightweight wood filler
- Fine-grit sandpaper
- A damp cloth
- Matching touch-up paint
- A stud finder, if needed
You may not need every item. The condition of the trim and wall determines what is appropriate.
If the baseboard is still attached at most points, avoid removing more trim than necessary.
How to Fix a Loose Baseboard Without Removing the Entire Trim
Step 1: Identify Exactly Where the Baseboard Is Loose
Press gently along the baseboard from several inches away from the problem area.
Find the points where the trim changes from firmly attached to loose. This gives you a better idea of how much needs to be secured.
Do not assume that the visible gap is the full extent of the problem. A section can look attached while still flexing slightly.
Mark the approximate loose area with a small removable pencil mark if that helps you keep track of it.
Step 2: Look for Existing Fastening Points
Inspect the face of the baseboard for small filled nail holes.
These can show you where the original installer placed fasteners. If a nail is visible and has backed out slightly, it may be possible to reset it rather than adding several new fasteners.
If you cannot see the nails because the holes were filled and painted, use the surrounding pattern as a guide.
The goal is to secure the trim to a solid point behind the wall rather than randomly placing nails where they may only grip drywall.
Step 3: Check for a Stud or Other Solid Support
When possible, determine where the wall framing is located.
A fastener driven into a stud provides much stronger support than one relying only on the surface of drywall. A stud finder can help locate framing, although the exact position should still be confirmed carefully.
If the loose section is near a stud, position the new fastening point so the nail can enter the framing without damaging nearby surfaces.
Do not hammer repeatedly in the same area if you are unsure what is behind the wall.
Step 4: Gently Pull the Loose Edge Forward Only If Necessary
If you need access to a particular area behind the baseboard, you usually do not need to remove the entire trim piece.
A small pry bar can be used carefully to create just enough space to inspect the area or reposition the trim.
Protect the wall with a thin piece of scrap wood or another suitable barrier between the tool and the painted surface.
Use gentle pressure.
The purpose is not to pull the baseboard completely away from the wall. Excessive force can crack paint, damage drywall, split the trim, or loosen nearby sections that were previously secure.
If the trim is firmly attached at both ends, work gradually rather than forcing the middle away.
Step 5: Clean the Contact Area
Dust, loose paint, old caulk, and debris can prevent the baseboard from sitting properly against the wall.
Clean the accessible area with a dry or slightly damp cloth. Allow the surface to dry fully before using adhesive or applying caulk.
If old caulk is preventing the baseboard from returning to its original position, carefully remove only the affected section.
Avoid aggressively scraping the wall or trim when there is no need to do so.
Step 6: Push the Baseboard Back Into Position
Once the area is clean, gently press the baseboard back against the wall.
Look at the top edge while doing this.
Does the trim now sit naturally against the wall? Or does it spring back out as soon as you release it?
If it stays in position, the repair may be straightforward. If it immediately moves away, there may be tension, warping, or another underlying issue that needs attention before fastening it.
Do not use a large amount of adhesive simply to force badly warped trim into position.
Step 7: Secure the Loose Section
For a wooden baseboard that needs mechanical fastening, a suitable finishing nail or brad can often be used at an appropriate fastening point.
Hold the baseboard firmly in its correct position and drive the fastener through the trim toward the solid support behind it.
Do not place fasteners too close to the edge of the trim because this can increase the chance of splitting.
For a painted baseboard, the fastener head can usually be recessed slightly and the small hole filled before touch-up painting.
The exact fastener size depends on the thickness of the trim and the construction behind it. The fastener should be long enough to provide secure attachment without unnecessarily penetrating too far into the wall.
If you are using a powered nailer, follow the manufacturer’s safety instructions and keep your hands clear of the firing area.
Step 8: Deal With a Small Remaining Gap
Once the baseboard is secure, inspect the top edge again.
A very small cosmetic gap between the trim and wall can often be finished with paintable caulk.
Apply a narrow bead rather than a thick layer. Smooth it carefully according to the product instructions, then allow it to dry before painting.
Caulk is mainly a finishing material in this situation. It should not be treated as a substitute for properly securing a baseboard that is physically moving.
Step 9: Fill and Touch Up the Fastener Hole
If you installed a new finishing nail or brad, apply a small amount of suitable filler to the recessed hole.
Let it dry according to the manufacturer’s instructions. Once dry, lightly smooth the area with fine-grit sandpaper.
Remove the sanding dust before applying matching paint.
For a small repair, careful touch-up painting can make the fastening point nearly invisible without repainting the entire baseboard.
What If the Baseboard Keeps Popping Back Out?
If the baseboard moves back out after you secure it, stop and investigate instead of adding more nails.
The trim may be warped. The wall may not be flat. The flooring may be pressing against the bottom edge. There could also be movement in the wall or framing.
A recurring gap can sometimes indicate moisture, settlement, or another condition that needs more attention.
Look at when the movement occurs. Does it happen only in one location? Does the gap change over time? Does the trim move when the floor is walked on?
These observations can help distinguish a simple loose fastening point from a larger problem.
What If the Drywall Is Damaged?
A new nail may not solve the problem if the drywall around the fastening point is damaged.
For example, if the drywall paper has torn away or the material is soft and crumbly, the fastener may simply pull out again.
In that situation, the repair may require restoring the damaged wall surface or choosing a fastening point with better support.
Do not keep driving fasteners into deteriorated drywall. You can end up creating a larger damaged area without making the baseboard more secure.
What If the Baseboard Is MDF Instead of Solid Wood?
Many modern baseboards are made from MDF rather than solid wood.
MDF can be more sensitive to moisture and can behave differently when fastened near damaged or swollen areas. If the material has swollen from water exposure, simply pressing it back into place may not restore its original shape.
Inspect the edges and lower portion carefully.
If the MDF is dry, intact, and only slightly loose, a localized fastening repair may be reasonable. If it is swollen, soft, or breaking apart, replacing the damaged section may be a better long-term solution.
Common Mistakes to Avoid
Using caulk to hold a moving baseboard
Caulk can hide a small cosmetic gap, but it is not normally the right solution for a baseboard that is physically loose.
Secure the trim first, then use caulk for the finish.
Adding nails without checking what is behind the wall
Random fastening can miss the framing and leave the baseboard weakly attached.
Take a moment to identify a suitable support point.
Pulling the entire baseboard away
If only a small section is loose, removing the whole trim piece can create unnecessary damage and additional work.
Start with the smallest repair that can solve the problem properly.
Filling the gap with too much material
A thick bead of caulk or filler may look acceptable at first but can shrink, crack, or remain visibly uneven.
Use the smallest amount needed for the final finish.
Ignoring moisture
If the baseboard is swelling, staining, softening, or repeatedly separating, look for moisture before completing the cosmetic repair.
Otherwise, you may be repairing the symptom rather than the cause.
Painting before the repair is stable
Do not rush to paint simply because the gap has temporarily disappeared.
Press gently on the repaired area and make sure the trim remains firmly attached first.
When Professional Help Makes Sense
A small loose section is usually a reasonable DIY project when the trim, wall, and surrounding area are in good condition.
Professional help makes more sense when the damage is extensive or the cause is unclear.
Consider getting qualified help if you find persistent moisture, significant wall movement, extensive drywall deterioration, major structural cracking, or repeated separation after several proper repairs.
You should also avoid DIY work that requires opening or modifying electrical, gas, or other hazardous systems unless you have the appropriate skills and local requirements allow you to do so.
The goal is not simply to make the baseboard look attached. It should be attached safely and for a sensible reason.
How to Prevent Baseboards From Becoming Loose Again
Once the repair is complete, avoid putting unnecessary pressure on the trim.
When moving furniture, keep heavy items from striking the baseboard. Be careful when vacuuming around corners and along the wall.
During normal cleaning, check for new gaps, movement, staining, or swelling. Finding a small change early is much easier than repairing a large section later.
It is also worth checking rooms where moisture is more common, particularly around bathrooms, kitchens, laundry areas, and exterior walls.
A baseboard that repeatedly comes loose is giving you useful information. Pay attention to the pattern instead of repeatedly covering it with caulk.
Frequently Asked Questions
Can I fix a loose baseboard without removing it?
Yes. When only a small section is loose and the trim is still in good condition, you can often secure that section in place without removing the entire baseboard.
Should I use caulk or nails to fix a loose baseboard?
They serve different purposes. A suitable fastener can secure physically loose trim, while paintable caulk can finish a small visible gap after the baseboard is secure.
Why does my baseboard keep coming loose?
Possible causes include inadequate fastening, movement in the wall or floor, warped trim, damaged drywall, or moisture. Repeated failure is a reason to investigate the cause rather than simply adding more filler or caulk.
Can I nail a baseboard directly into drywall?
A fastener can be used in some situations, but attachment to solid framing generally provides better support. The appropriate method depends on the wall construction and the location of the loose section.
How do I fix a small gap between the baseboard and wall?
First make sure the baseboard itself is secure. If the remaining gap is small and purely cosmetic, a narrow bead of suitable paintable caulk can often provide a clean finish.
What should I do if the baseboard is swollen?
Find and address the moisture source first. If the trim has significantly swollen or deteriorated, fastening it back into position may not provide a durable repair.
Do I need to repaint the whole baseboard after repairing it?
Not necessarily. For a small repair, you can often fill the fastening hole, smooth it, and touch up the affected area with matching paint. The result depends on the paint color, age, finish, and condition of the existing surface.
Final Thoughts
A loose baseboard does not automatically mean you need to remove an entire length of trim. In many cases, the problem can be solved by carefully identifying the loose section, checking the wall and trim condition, securing the baseboard at a suitable support point, and finishing the remaining gap properly.
The most important part is finding out why the baseboard became loose in the first place. A simple fastening problem can be repaired quickly. A recurring gap, damaged wall, swollen trim, or moisture problem deserves closer attention.
Work slowly, use only the materials you actually need, and avoid turning a small trim repair into a much larger project.