
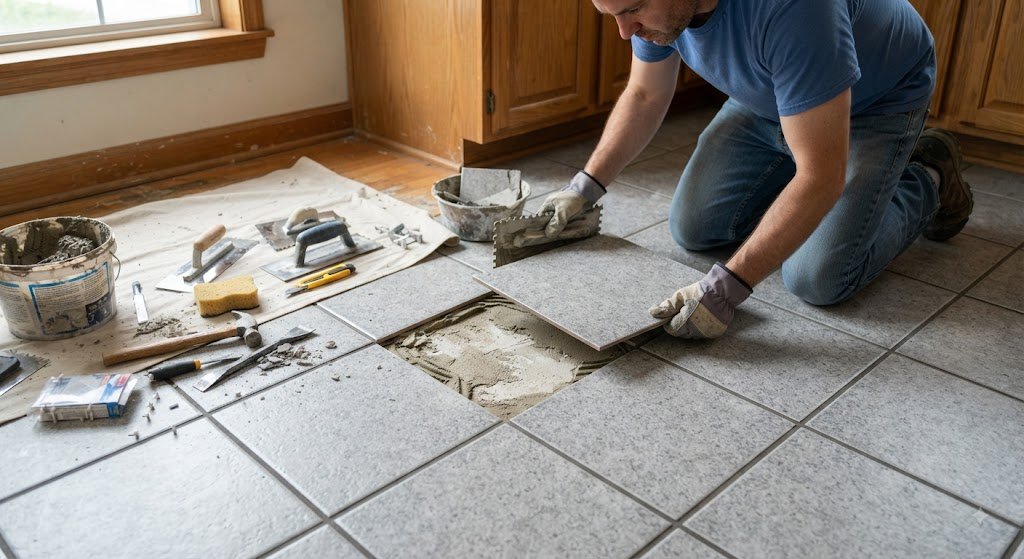
A cracked or badly chipped ceramic floor tile can make an otherwise good floor look worn out. Fortunately, you usually do not need to remove the entire floor just because one tile is damaged. If the surrounding tiles are firmly installed and you have a suitable replacement tile, a single-tile repair can often be completed with careful DIY work.
The difficult part is removing the damaged tile without breaking the tiles around it. You also need to prepare the surface underneath properly and install the replacement at the same height as the surrounding floor.
This repair takes patience more than strength. Rushing the removal process can turn a one-tile repair into a much larger job.
When Replacing One Ceramic Tile Makes Sense
Replacing an individual tile is most suitable when the damage is clearly limited to one tile.
A single tile may need replacement because it has cracked after an impact, developed a large chip, become loose, or suffered damage that cannot be repaired with grout or surface treatment.
Before starting, inspect the tiles around it. They should feel stable when gently pressed and should not show major cracks or movement.
If several nearby tiles are loose or cracked, there may be an underlying problem with the floor rather than one defective tile. In that situation, replacing only the visible damaged tile may not solve the problem.
You should also make sure the replacement tile is compatible with the existing floor. Ideally, it should match the original size, thickness, surface finish, and color as closely as possible.
What You Need for the Repair
The exact materials depend on the tile and floor construction, but a basic repair may require:
- A matching replacement ceramic tile
- Grout removal tool
- Hammer
- Small cold chisel or suitable tile-removal tool
- Safety glasses
- Work gloves
- Vacuum or soft brush
- Appropriate tile adhesive or mortar
- Notched trowel suitable for the installation
- Tile spacers if required
- Grout
- Grout float
- Sponge and clean water
- Clean cloth
Follow the instructions for the specific adhesive, mortar, and grout you choose. Products vary, and the correct application method can affect the finished repair.
Do not use a material simply because it is already available in your garage. The bonding product needs to be suitable for the tile and surface beneath it.
Before You Start, Find a Matching Tile
The replacement tile is one of the most important parts of the repair.
If you have leftover tiles from the original installation, use one of those if possible. This usually gives you the best chance of getting a close match.
If you do not have a spare, take measurements of the existing tile and look for the same or a very similar product. Keep in mind that even tiles with the same name or size can look slightly different after years of use because the existing floor may have changed in color or appearance.
Do not remove the damaged tile until you have a replacement available unless you are comfortable leaving the area unfinished while you search.
[Internal link opportunity: article about why floor tiles become loose and what to check]
Inspect the Damaged Tile and Surrounding Floor
Before using any tools, examine the damaged area.
Check whether the tile is cracked from one edge to another, broken into pieces, or simply chipped. Then look at the grout around it.
Press gently on the surrounding tiles. They should not move independently.
Also consider whether the tile is located near a plumbing fixture or an area where water regularly reaches the floor. If you suspect moisture underneath the tile, find and address the source before replacing it.
If the floor itself feels unstable or several tiles are affected, a professional inspection may be more appropriate than a one-tile repair.
How to Remove a Damaged Ceramic Tile
Removing the damaged tile is the stage that requires the most care.
1. Clear and protect the work area
Remove furniture, rugs, and other objects around the tile.
Wear safety glasses because ceramic fragments can break away unexpectedly. Gloves can also help protect your hands from sharp edges.
Keep children and pets away from the work area while you are breaking and removing the tile.
If you are using an electric tool, follow its safety instructions and make sure the working area is dry.
2. Remove the grout around the tile
Start by removing the grout from all four sides of the damaged tile.
A manual grout removal tool can work well for a small repair because it allows controlled movement.
The goal is to separate the damaged tile from its neighbors. Do not skip this step. If grout remains tightly connected to surrounding tiles, breaking the damaged tile can transfer force into those tiles and cause unnecessary damage.
Work slowly along each joint until you have created a clear separation.
3. Break the damaged tile from the center
Do not start by hitting the tile near its edge.
Instead, place a protective cloth over the damaged tile if appropriate and carefully create an opening near the center using a suitable hammer and tool.
Once the center is broken, work gradually outward toward the edges.
The objective is to remove small pieces rather than trying to lift the entire tile in one piece.
Ceramic fragments can be sharp, so keep your hands away from the area where the tile is breaking.
4. Work toward the edges carefully
As you get closer to the surrounding tiles, reduce the amount of force you use.
The tile may be bonded firmly in some places and loose in others. Remove individual pieces instead of trying to pry the entire tile out at once.
Be especially careful near the corners because the edge of a neighboring tile can chip if struck.
If the damaged tile is proving difficult to remove, slow down rather than increasing the force.
5. Remove old adhesive or mortar
Once the tile has been removed, you will usually find adhesive or mortar underneath.
The replacement tile needs a suitable surface. Remove loose or raised material carefully, but avoid damaging the underlying floor or substrate.
The surface should be reasonably clean, stable, and prepared according to the instructions for the new bonding product.
Vacuum away dust and small fragments before proceeding.
Check the Surface Under the Tile
This is an important opportunity to see what is happening underneath the floor.
Look for loose material, cracks, dampness, staining, or other obvious signs of damage.
If the surface underneath is sound, you can continue with the replacement.
If you find significant moisture, crumbling substrate, or an unexpected structural problem, stop before installing the new tile. Covering the problem with a new tile may only lead to another failure.
A persistent moisture problem should be corrected before the floor is repaired.
How to Install the Replacement Ceramic Tile
1. Dry-fit the new tile
Before applying adhesive or mortar, place the replacement tile into the empty space.
Check that it fits without forcing it into position. The joint gaps should be consistent with the surrounding tiles.
If the replacement is too large, do not try to force it into the opening. If it is noticeably smaller, the grout lines may look different from the rest of the floor.
Dry-fitting also lets you confirm that the tile sits at approximately the correct height.
2. Apply the bonding material
Prepare the adhesive or mortar according to the manufacturer’s instructions.
Apply it to the prepared surface using the recommended trowel. The ridges created by the notched trowel help distribute the material more consistently than spreading it randomly.
Do not apply an unnecessarily thick layer to compensate for an uneven surface. If the substrate needs substantial correction, it may require separate preparation before the tile is installed.
3. Set the tile in place
Lower the tile carefully into the opening.
Use the surrounding tiles as your guide for alignment. Make sure the grout joints are consistent and that the surface is level with the adjacent tiles.
Depending on the product and installation method, gentle movement may help the tile settle into the bonding material. Do not press so hard that excessive adhesive is forced out of the joint.
Remove any adhesive that squeezes into the grout spaces while it is still manageable and according to the product instructions.
4. Check the tile height
Run a clean, straight edge across the replacement tile and nearby tiles.
The new tile should not sit noticeably higher or lower than the surrounding floor.
This matters not only for appearance but also because a raised tile can catch footwear and become an annoying trip point.
If the height is wrong, correct it while the bonding material is still workable rather than waiting until it has hardened.
5. Let the adhesive cure
Do not immediately walk across the repaired area.
The bonding material needs time to set and cure. Follow the manufacturer’s instructions for foot traffic and grout application.
Even if the tile feels firm shortly after installation, the material underneath may still be developing its final strength.
Regrout the Replacement Tile
Once the bonding material has cured as required, fill the joints around the replacement tile with suitable grout.
Apply the grout so the joints are properly filled rather than leaving shallow gaps.
Use a grout float or the recommended applicator and remove excess material from the tile surface.
Clean the surrounding tile carefully with a damp sponge without washing the fresh grout out of the joints.
Allow the grout to cure according to the product instructions.
If the surrounding grout is old or discolored, the replacement joint may look noticeably different. That does not necessarily mean the repair was done incorrectly. Older grout can change appearance over time.
Common Mistakes to Avoid
Breaking the tile without removing the grout
This is one of the easiest ways to damage neighboring tiles. Remove the surrounding grout first so the damaged tile is separated from the tiles around it.
Hitting the tile near its edges
The edges are close to the tiles you want to keep. Work from the center outward and reduce force as you approach the perimeter.
Installing over a dirty surface
Dust, loose adhesive, and fragments can interfere with the new bond. Surface preparation is a major part of a successful repair.
Using too much adhesive
Adding a thick layer of bonding material to make up for an uneven floor can cause the replacement tile to sit higher than its neighbors.
Walking on the tile too soon
A tile can feel stable before the adhesive has properly cured. Follow the manufacturer’s recommended waiting period.
Ignoring the reason the tile failed
If the original tile cracked because the floor is moving, the replacement may eventually crack too.
Likewise, if moisture is damaging the substrate, replacing the visible tile without addressing the water source is unlikely to provide a lasting solution.
When You Should Not Do This Repair Yourself
A single damaged ceramic tile is often a manageable DIY repair, but not every flooring problem should be handled this way.
Consider professional help if you discover significant water damage, widespread movement, a damaged subfloor, structural concerns, or multiple failing tiles.
You should also be cautious if the floor contains materials or systems you do not understand. Some older buildings may contain materials that require specialist assessment before disturbance.
If the tile is part of a waterproofed area and you are unsure how the waterproofing system works, avoid damaging the layers underneath it. A professional can determine the appropriate repair method.
For renters, check your rental agreement and contact the property manager before making a permanent flooring alteration.
How to Prevent Future Tile Damage
Once the replacement is complete, avoid treating the repaired tile differently from the rest of the floor.
Clean spills reasonably quickly, particularly in areas where water is common. Use suitable cleaning products for the tile and grout rather than aggressive chemicals that may damage the surface or joints.
Take care when moving heavy furniture. Lifting or using suitable furniture-moving equipment can reduce the chance of impact damage.
If a tile begins to move or the grout around it repeatedly cracks, investigate the issue early. A small flooring problem is generally easier to address before neighboring tiles become involved.
If the original damage came from an impact, consider whether the cause can be avoided. If it came from movement or moisture, correcting the underlying issue is more important than simply replacing the visible tile.
Frequently Asked Questions
Can I replace just one cracked ceramic floor tile?
Yes, if the surrounding tiles are stable and you can access a suitable replacement. The damaged tile should be removed carefully, the surface prepared, and the replacement installed using an appropriate bonding material.
Do I have to remove the whole floor to replace one tile?
No. Individual tiles can often be removed and replaced without disturbing the rest of the floor. The main challenge is protecting the surrounding tiles during removal.
What if I cannot find an exact replacement tile?
Look for leftover tiles first, then check the original manufacturer or local tile suppliers if you know the product. If an exact match is unavailable, you may need to choose the closest available match or consider replacing a larger visually connected area.
Why did my ceramic tile crack in the first place?
Possible causes include impact, inadequate support beneath the tile, movement in the floor, installation problems, or stress from changes in the underlying surface. The appearance and location of the crack can provide clues, but they cannot always identify the cause on their own.
Can I glue a cracked tile back together?
A repaired cracked tile may not provide the same appearance or strength as a replacement. If a matching tile is available, replacing the damaged tile is often a more straightforward approach for a floor surface.
How long should I wait before walking on a replacement tile?
The correct waiting period depends on the adhesive or mortar used. Follow the manufacturer’s instructions rather than relying on how firm the tile feels.
Final Thoughts
Replacing one damaged ceramic tile does not usually mean replacing the whole floor. With a matching tile, careful grout removal, controlled tile removal, proper surface preparation, and the correct bonding material, a localized repair can restore the damaged section without disturbing the surrounding floor.
The most important part is not rushing. Protect the neighboring tiles, inspect the surface underneath, and investigate any sign of moisture or movement before installing the replacement.
If the damage is widespread or the floor itself appears unstable, stop treating the issue as a one-tile problem. Finding the underlying cause first can save you from making the same repair again.