
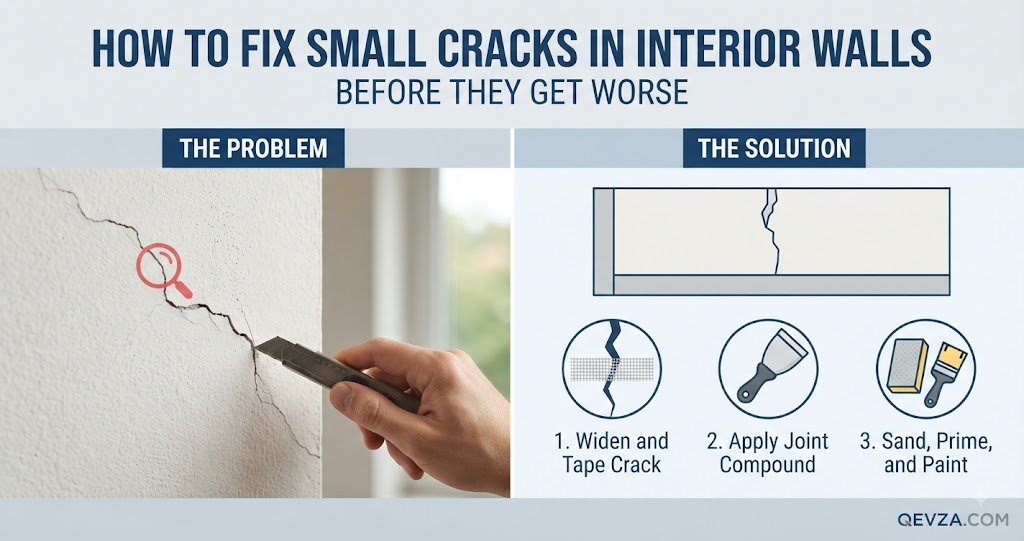
A small crack in an interior wall can be annoying, especially when you have just finished painting or decorating a room. You may notice a thin line above a doorway, near a corner, around a window, or across an otherwise smooth wall.
Many small cracks are related to normal movement of the building or changes in the materials beneath the finish. Others can develop because a drywall joint was not repaired properly, old joint compound has failed, or a previous repair has separated.
The important part is deciding what kind of crack you are looking at before you cover it.
A hairline surface crack that has remained unchanged for a long time can often be repaired as a DIY project. A crack that is widening, repeatedly returning, accompanied by moisture, or associated with other building damage deserves more investigation.
This guide shows you how to inspect a small interior wall crack, prepare it for repair, apply the right material, and decide when a simple patch is not the right solution.
First: Don’t Assume Every Wall Crack Is the Same
A crack is a visible symptom, not a diagnosis.
Two cracks can look similar but have completely different causes.
For example, a thin line along a drywall joint may result from movement between sheets or failure of the joint treatment. A crack around a window could be related to movement around the opening. A crack in plaster may behave differently from one in modern drywall.
Before reaching for filler, look at the crack carefully.
Ask yourself:
- Is it new or has it been there for years?
- Is it getting longer or wider?
- Is the surrounding wall dry?
- Is the surface solid?
- Is the crack only in the paint or does it continue through the wall finish?
- Is the crack associated with loose tape or peeling material?
- Are there other cracks nearby?
- Does the same crack keep returning after repairs?
These observations are more useful than relying on a single measurement.
What Small Wall Cracks Commonly Look Like
Hairline cracks in the paint
A very fine line may be limited to the paint or the thin surface layer beneath it.
If the wall is otherwise sound and the line does not appear to be changing, the repair may be relatively simple.
Cracks along drywall joints
Drywall sheets are joined together with joint tape and compound. Movement, poor joint preparation, or an aging repair can cause a visible line to reappear along the joint.
These cracks sometimes return if the underlying joint is not repaired properly.
Cracks around doors and windows
Openings interrupt the wall structure and create areas where movement can become more noticeable.
A small crack in this location is not automatically a structural problem, but it should be inspected carefully, particularly if it is widening or accompanied by sticking doors, visible gaps, or other changes.
Cracks around corners
Inside corners can develop cracks where two surfaces meet.
These may be related to movement between the surfaces or failure of the material used to finish the joint.
The correct repair depends on whether the crack is within the drywall surface, at the joint, or between different materials.
When You Should Not Immediately Patch the Crack
A repair should not be your first step if you have reason to believe the wall has an underlying problem.
Pause and investigate if:
- the crack is rapidly getting wider
- the wall feels soft or swollen
- there is visible water staining
- the area is damp
- plaster or drywall is separating from the wall
- several new cracks are appearing at the same time
- a crack extends through multiple materials
- you notice significant changes around doors or windows
- the crack is accompanied by other building movement or damage
These signs don’t automatically prove that there is a serious structural problem.
They do mean that simply filling the crack may hide an issue that needs attention.
A Better Way to Judge the Crack
Instead of using a fixed rule such as “anything thinner than X is safe,” look at several characteristics together.
Width
A very narrow crack that has remained stable is generally less concerning than one that is visibly widening.
You can photograph the crack and record its approximate width so you can compare it later.
Length
A short isolated crack is different from a crack that continues across a large part of the wall.
Length alone doesn’t determine the cause, but it provides useful context.
Direction
Note whether the crack is:
- vertical
- horizontal
- diagonal
- following a joint
- following a corner
- surrounding an opening
The direction can provide clues, but it should not be used by itself to diagnose a structural problem.
Change over time
This is one of the most useful things you can observe.
If a crack looks exactly the same after weeks or months, that is different from one that is clearly growing.
Take a clear photograph and note the date. If necessary, repeat the photograph later from the same position.
Other symptoms
Look beyond the crack itself.
Check for:
- dampness
- staining
- loose wall material
- bulging
- sticking doors
- gaps around trim
- additional cracks
The surrounding condition can tell you much more than the crack’s appearance alone.
What You Need to Repair a Small Drywall Crack
For a small, stable crack in an otherwise sound drywall surface, you may need:
- a putty knife or taping knife
- fine sandpaper or a sanding sponge
- suitable joint compound or repair compound
- primer
- matching wall paint
- a clean cloth or suitable method for removing dust
- protective eyewear when sanding
For a crack involving loose drywall tape, you may also need replacement drywall tape and additional joint compound.
The exact materials depend on the wall construction and the size and location of the repair.
Step 1: Clean the Area
Remove dust, loose debris, and surface contamination around the crack.
The surface needs to be clean enough for the repair material to bond properly.
Don’t saturate damaged drywall with water.
If the area is damp, stop and investigate why before continuing.
Step 2: Remove Loose Material
Run the edge of a putty knife carefully along the crack.
Remove paint, joint compound, or other material that is already loose.
Don’t try to preserve a piece of material simply because it is still attached at one edge.
If it is poorly bonded, leaving it underneath the repair can cause the problem to return.
Work carefully so you don’t unnecessarily enlarge a sound section of the wall.
Step 3: Inspect the Crack After Cleaning
This is the point where the repair becomes easier to understand.
Look at the exposed area.
Is it simply a shallow surface crack?
Does the crack follow a drywall joint?
Is the drywall tape loose?
Is there a gap between materials?
Is the wall underneath soft?
If you find moisture, significant material damage, or a crack that appears to extend deeper into the wall assembly, stop and investigate rather than simply filling it.
Step 4: Prepare the Crack for Filler
For a small surface crack in drywall, gently opening the very narrow surface line can help expose loose edges and give the repair material a sound area to bond to.
Do not aggressively cut a large channel into the wall.
The goal is controlled preparation, not making the damage bigger than necessary.
Remove any loose dust after preparation.
Step 5: Apply the Repair Compound
Apply a thin layer of suitable joint compound or drywall repair compound over the prepared area.
Press the material into the crack rather than simply spreading a thick layer over the top.
Then use the edge of the knife to remove excess material.
The repair should be wider than the original crack but thin enough that you can feather its edges into the surrounding wall.
A thick mound of compound creates another problem: a visible bump after painting.
Step 6: Let the Repair Dry
Allow the compound to dry according to the manufacturer’s instructions.
Drying time can vary depending on:
- product type
- thickness
- temperature
- humidity
- ventilation
Don’t sand or repaint simply because the surface feels dry at the very top.
The repair needs to be sufficiently dry for the next stage.
Step 7: Sand the Repair Smooth
Use fine sandpaper or a sanding sponge to smooth the repaired area.
Work gently.
You want to remove ridges and blend the edges, not create a large depression in the wall.
Run your fingers lightly across the area after sanding.
You should be able to feel a smooth transition between the repaired section and the surrounding wall.
Step 8: Deal With a Repair That Still Shows
If you can still see the crack or a shallow depression after the first application has dried, don’t simply add a huge amount of compound.
Apply another thin layer, feather the edges, allow it to dry, and sand again if necessary.
Several thin applications can produce a better result than one thick application.
Step 9: Prime the Repaired Area
A repaired section can absorb paint differently from the surrounding painted wall.
Applying a suitable primer to the repaired area can help create a more consistent surface before the finish coat.
This is particularly useful when joint compound or another porous repair material has been exposed.
Allow the primer to dry according to its instructions.
Step 10: Repaint the Area
Use the original wall paint if you still have it and it is suitable for the surface.
Apply the paint according to the manufacturer’s instructions.
Don’t assume that a small patch will always disappear.
Older wall paint may have changed in color or sheen over time. Even a correctly matched color can look different when applied only to a small section.
If the touch-up remains obvious, painting the entire wall from one natural stopping point to another can produce a more uniform appearance.
What If the Crack Has Loose Drywall Tape?
Loose tape needs a different repair.
Simply spreading compound over bubbling or detached tape does not solve the problem underneath.
If the tape has separated from the drywall, the loose section generally needs to be removed and the joint properly retaped and finished.
This takes more work than filling a hairline surface crack.
If the damaged joint is extensive or you are not comfortable working with drywall tape and joint compound, professional repair may be worthwhile.
Should You Use Spackle or Joint Compound?
It depends on the repair.
Small nail holes and tiny surface imperfections can often be handled with an appropriate patching product.
Drywall joints and repairs involving tape are generally better suited to joint compound and the appropriate drywall repair method.
Don’t choose a product simply because it says “wall filler.”
Read the product instructions and make sure it is suitable for the material and size of repair you are making.
What About Caulk?
Caulk has useful applications around a home, but it is not a universal substitute for drywall repair compound.
A flexible, paintable product may be appropriate for certain joints where two different materials meet or where controlled movement is expected.
A crack running through a drywall surface or drywall joint usually needs a repair method appropriate for drywall rather than simply filling the line with ordinary caulk.
If you’re unsure whether the crack is a material joint or a damaged drywall surface, identify the construction first.
Why Do Cracks Come Back After Repair?
A returning crack does not automatically mean the building has a serious structural problem.
There are several possible explanations.
The repair may have been too shallow.
Loose tape may have been left underneath.
The surface may not have been properly prepared.
The wall may continue to experience movement.
The wrong repair material may have been used.
Or the underlying condition may not have been addressed.
If the same crack repeatedly reappears, stop treating it as a simple cosmetic repair and investigate why.
How to Prevent Small Wall Cracks From Returning
You cannot prevent every crack.
Buildings move. Materials respond to changes in temperature and humidity, and repairs can age.
You can, however, reduce avoidable problems by keeping walls in good condition.
Repair loose or damaged areas instead of painting over them.
Keep indoor moisture at a reasonable level for your climate and building.
Fix plumbing or water-entry problems promptly.
Use appropriate materials for drywall repairs.
Prepare surfaces properly before painting.
Avoid applying thick layers of filler over moving joints.
Most importantly, pay attention when a crack changes rather than assuming it is always cosmetic.
What About Cracks in Plaster Walls?
Don’t automatically use the same repair method for plaster as you would for drywall.
Older homes may have plaster systems with different construction and behavior.
A small surface crack in otherwise sound plaster may be repairable, but loose plaster, widespread cracking, bulging, or areas that sound hollow and appear detached require more careful assessment.
If you are unsure what your wall is made from, identify the material before choosing a repair product.
What About Cracks Near a Ceiling?
A small crack near the ceiling can have several causes, including movement at a joint or changes in the materials.
Look for other signs before deciding how to repair it.
If the ceiling or wall is damp, stained, sagging, or soft, investigate the source of the problem first.
Do not treat active water damage as an ordinary cosmetic crack.
What About Cracks Around Doors and Windows?
These locations deserve a closer inspection because openings create transitions in the wall.
A small stable crack can sometimes be repaired normally.
But if you notice a crack getting larger, gaps developing around the frame, doors suddenly becoming difficult to close, or several related changes, don’t simply fill the crack and repaint.
Those additional signs provide a reason for further assessment.
When Should You Call a Professional?
A professional inspection is sensible when you cannot determine why a crack is developing or when the surrounding wall shows other signs of damage.
Get additional help if:
- the crack is growing noticeably
- new cracks are appearing throughout the property
- the wall is damp or water-damaged
- drywall or plaster is bulging or separating
- the crack is accompanied by significant gaps or movement
- doors or windows have developed unusual alignment problems
- a large section of wall is damaged
- the repair repeatedly fails
- you are concerned about structural movement
- you are dealing with a wall whose construction or previous repairs you do not understand
The purpose of professional help is not simply to make the crack disappear. It is to determine whether the visible crack is being caused by a larger problem.
A Simple DIY Decision
Use this as a starting point rather than a rigid diagnosis.
Small, stable crack + dry, solid wall + no other symptoms:
A careful surface repair may be reasonable.
Crack along a drywall joint + loose tape:
Repair the joint properly rather than simply filling the visible line.
Crack + dampness or staining:
Find the moisture source before repairing the surface.
Crack that repeatedly returns:
Investigate why the repair is failing.
Crack that is widening or accompanied by other movement:
Consider professional assessment.
Large, widespread, or unexplained cracking:
Don’t rely on cosmetic patching alone.
Common Mistakes to Avoid
Painting over the crack
Paint may hide a very fine line temporarily, but it doesn’t repair the damaged surface.
Filling over loose material
If the surrounding compound or tape is already detached, new compound is being applied to an unstable base.
Creating an unnecessarily large groove
Overcutting the wall makes the repair larger and creates more finishing work.
Applying one thick layer of compound
Thick filler can shrink, remain noticeable, or require extensive sanding.
Thin layers are often easier to control.
Skipping primer
A repaired area can absorb paint differently from the surrounding wall.
Primer can help reduce the visible difference.
Ignoring moisture
A beautiful repair will not last if water is still reaching the wall.
Assuming every crack is harmless
Many small cracks are minor, but appearance alone cannot establish the cause.
Frequently Asked Questions
Are small cracks in interior walls normal?
Some small cracks can occur as buildings and finishing materials move or age. A stable, fine crack in an otherwise sound wall may be minor, but a crack should be judged together with its location, progression, and surrounding conditions.
Should I fill a hairline crack before painting?
If the crack is suitable for cosmetic repair, preparing and filling it before painting will usually produce a better result than simply painting over it.
Why does my wall crack keep coming back after I repair it?
The repair may not have addressed the underlying joint, loose tape, movement, moisture, or another cause. Repeated failure is a reason to inspect the area more closely.
Can I use spackle on a wall crack?
Some patching products are suitable for small surface repairs, but larger cracks or drywall joints may require joint compound and, where appropriate, tape. Follow the product instructions for the specific repair.
Should I sand a wall crack before filling it?
You generally need to remove loose material and prepare the surface first. Light sanding may be useful during finishing, but aggressive sanding is not necessary for every crack.
How do I know if a crack is getting worse?
Take a clear photograph and note the date. Comparing the same area over time can help you see whether the crack is changing.
Why is there a crack above my door?
The area around a door is a transition in the wall and can develop visible cracking for several reasons. A small stable crack may be a finishing problem, but widening cracks or other changes around the opening deserve further investigation.
Can I repair a crack if the wall is damp?
No. Find and address the moisture source first. Repairing a damp wall can result in another failed repair and may leave hidden damage untreated.
Final Thoughts
A small wall crack is worth inspecting before you cover it.
The best repair starts with understanding what you are seeing. Check the crack’s size, direction, location, condition, and whether it is changing. Look at the surrounding wall for moisture, loose material, stains, or other signs that point to a larger problem.
If the wall is dry, solid, and the crack is small and stable, careful preparation followed by the appropriate filler, sanding, primer, and paint can often restore the surface.
If the crack keeps returning, grows noticeably, or appears alongside other damage, don’t keep applying filler and hoping it disappears. Find out why it is happening.
A successful wall repair is not simply one that looks good immediately after painting. It is one where the surface has been properly prepared and the reason for the damage has been considered before the repair is finished.