
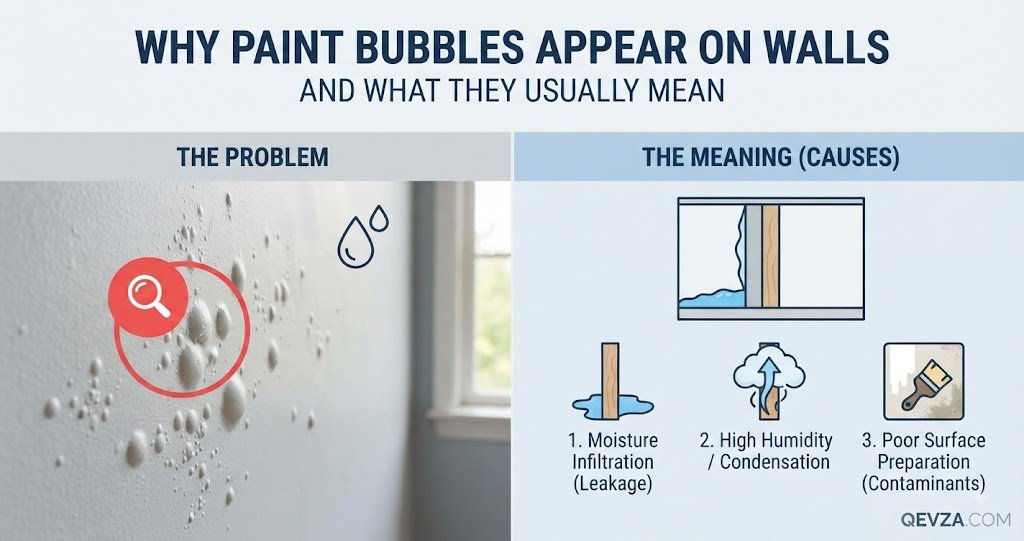
Paint bubbles, blisters, or raised areas on a wall can appear a few hours after painting or several months later. Sometimes the problem is limited to one small patch. In other cases, bubbles spread across a large section of the wall.
The important thing is not to treat the bubble itself as the problem.
A raised patch is usually a sign that the paint has lost proper contact with the surface underneath. Moisture, heat, poor surface preparation, incompatible paint layers, or another condition can cause that failure.
If you simply flatten the bubble and paint over it, the new coating may fail again. The better approach is to find out why the paint lifted before repairing the surface.
This guide explains how to inspect bubbling paint, how to tell the likely cause from its location and appearance, how to repair a small affected area, and when the problem is better left to a professional.
What Does Bubbling Paint Actually Mean?
Paint is designed to form a continuous film that stays attached to the wall beneath it. When that bond becomes weak, part of the coating can separate from the surface and form a raised pocket.
The pocket may contain air, moisture, or simply a space created because the coating has lost adhesion.
That is why paint bubbling is not always caused by the same thing.
A small blister on an otherwise dry wall could be related to poor preparation. Bubbles around a window, bathroom, ceiling, or plumbing area deserve more investigation because moisture may be involved.
The location of the damage is therefore one of the first clues worth examining.
First, Look at Where the Bubbles Are Appearing
Before getting out a scraper, stand back and look at the whole wall.
Bubbles around a window
Check the window frame, sill, surrounding sealant, and nearby wall for signs of water entry or condensation.
If the problem appears after heavy rain, inspect the area more carefully rather than assuming the paint itself is defective.
Bubbles near a bathroom
Bathrooms naturally have higher humidity than most rooms. Poor ventilation, repeated condensation, water splashes, or a leak can contribute to paint failure.
If the wall feels damp or the paint repeatedly peels after repair, investigate the moisture source instead of continually repainting.
Bubbles below plumbing
A patch below a bathroom, kitchen, sink, pipe, or other water source deserves attention.
Look for other signs such as staining, soft drywall, discoloration, or a damp smell.
Bubbles on an exterior-facing wall
A cold wall can sometimes develop condensation when warm, humid indoor air reaches a colder surface. Poor insulation or ventilation can make the situation worse.
However, don’t automatically assume condensation is the cause. Check for plumbing leaks, exterior water entry, and other sources first.
Bubbles scattered across a newly painted wall
When blistering appears soon after painting and is spread across several areas, the cause may be related to preparation, drying conditions, the previous coating, or the way the new paint was applied.
This is different from a single damaged patch caused by a localized water problem.
Check Whether the Surface Is Dry or Damp
One of the most useful checks is also one of the simplest.
Press gently around the damaged area. Don’t push hard enough to damage the wall.
If the surface feels unusually soft, damp, or weak, stop treating the problem as a simple painting defect.
If you have a moisture meter, you can use it to compare the affected area with a nearby section of the same wall. A higher reading can provide a useful clue, although the exact reading that indicates a problem depends on the wall material and meter being used.
If you don’t have a moisture meter, you can still look for obvious signs:
- yellow or brown staining
- soft drywall
- swollen joint compound
- peeling that keeps returning
- dampness around pipes or windows
- musty odors
- damage that becomes worse after rain or heavy bathroom use
A dry surface does not automatically prove that moisture was never involved, but persistent dampness is a strong reason to investigate before repairing the paint.
Common Causes of Paint Bubbles
Moisture Behind the Paint
Moisture is one of the most important causes to rule out.
Water can enter through plumbing leaks, roof problems, window openings, exterior cracks, condensation, or other building defects. When moisture reaches the painted surface, it can weaken the bond between the coating and the substrate.
If you repair the paint without correcting the source, the new coating may bubble again.
This is why recurring bubbling in exactly the same area should never be treated as just a painting problem.
Painting Over a Dirty Surface
Paint needs a reasonably clean surface to bond properly.
Grease, cooking residue, soap deposits, dust, and other contaminants can interfere with adhesion. This is especially relevant in kitchens, bathrooms, utility areas, and walls that have not been cleaned for a long time.
A wall can look clean from a distance and still have enough residue to affect a new coat of paint.
Painting Over a Glossy or Incompatible Coating
A new coating does not automatically bond well to every old finish.
Very glossy surfaces can provide poor mechanical adhesion if they are not prepared correctly. Problems can also occur when a new coating is applied over an old finish without following the paint manufacturer’s preparation and compatibility instructions.
If the old coating is loose, peeling, or poorly bonded, painting over it simply transfers the problem to the next layer.
Painting on a Damp Surface
Walls need to be sufficiently dry before painting.
This can be an issue after cleaning, patching, water damage, or in rooms with persistent humidity.
Painting over a surface that has not dried properly can interfere with the coating’s ability to form a sound finish.
Excessive Heat During Application
Paint needs suitable conditions while it dries.
Direct sunlight, very hot surfaces, strong heat sources, or unsuitable environmental conditions can cause the outer part of a coating to dry differently from the material underneath.
The result can be an uneven or poorly bonded finish.
Always follow the temperature, humidity, and application instructions on the specific paint product rather than relying on a general rule.
Poor Surface Preparation
Many painting problems begin before the roller touches the wall.
Loose paint, chalky surfaces, old damaged coatings, unfilled holes, dusty sanding residue, and unprimed repairs can all create weak points.
A fresh coat can look excellent immediately after application while still having a poor foundation underneath.
A Simple Way to Diagnose the Problem
You don’t need to guess immediately.
Work through these questions:
Did the bubbling appear soon after painting?
If yes, think about surface preparation, contamination, drying conditions, or the condition of the previous coating.
Is the affected area damp?
If yes, investigate the moisture source before repainting.
Is the bubbling concentrated around a window, ceiling, bathroom, or plumbing area?
If yes, look for a localized moisture problem.
Is the old paint underneath loose or peeling?
If yes, the problem may extend beyond the visible bubble.
Is the entire wall affected?
If yes, consider whether the issue is related to the original painting process, the wall surface, indoor humidity, or another widespread condition.
This kind of diagnosis is more useful than simply asking which product will cover the bubble.
How to Repair Small Areas of Bubbling Paint
Once you have determined that the wall is dry and there is no unresolved leak or other underlying problem, a small damaged area can often be repaired.
Step 1: Protect the Work Area
Move furniture away from the wall and cover nearby surfaces.
Wear suitable eye protection when scraping or sanding. If the existing paint is old and you are unsure what it contains, don’t sand or disturb it aggressively until you have considered whether testing or professional advice is appropriate.
Step 2: Remove the Loose Paint
Use a putty knife or paint scraper to carefully remove paint that is already loose.
Don’t stop at the visible center of the bubble.
Continue until you reach surrounding paint that is firmly attached.
The goal is to remove the failed coating without unnecessarily damaging sound areas.
Step 3: Inspect the Exposed Surface
Now look at what was underneath the paint.
Check for:
- dampness
- staining
- soft drywall
- crumbling joint compound
- chalky residue
- glossy old paint
- bare drywall
- additional loose coating
This step can tell you whether you are dealing with a simple paint failure or something that requires further repair.
If the exposed surface is damp, stop here and find the moisture source.
Step 4: Smooth the Edges
Once the surface is dry and the underlying issue has been addressed, lightly sand the edge of the damaged area so the transition between old paint and exposed surface is smoother.
Avoid aggressively sanding more area than necessary.
Remove sanding dust before continuing.
Step 5: Repair Damaged Wall Material
If scraping has exposed a shallow depression or damaged joint compound, apply an appropriate wall-repair compound according to the product instructions.
Allow it to dry completely.
Then sand the repaired area until it is reasonably smooth and level with the surrounding wall.
Deep damage may require more than one application.
Step 6: Prime the Repaired Area
Primer can help create a more consistent surface before the finish coat is applied.
Choose a primer that is appropriate for the exposed material and the type of paint you intend to use.
If the wall previously had a moisture problem, don’t use primer as a substitute for fixing that problem.
Primer can prepare a surface. It cannot repair a leaking pipe, failed seal, roof leak, or persistent condensation problem.
Step 7: Repaint
Apply the compatible finish paint according to the manufacturer’s instructions.
Avoid putting an excessively thick coat over the repair.
For a small patch, blending can be difficult because the repaired area may have a different texture or sheen from the surrounding wall. If the patch remains visible after drying, repainting the wall section from corner to corner may produce a more consistent appearance.
Allow the coating to dry properly before deciding whether another coat is necessary.
What You Should Not Do
Don’t simply press the bubble flat
Flattening the raised paint does not restore the bond underneath it.
If the coating has already separated, it can lift again.
Don’t paint directly over loose paint
A new coat cannot reliably hold a failing layer in place.
Remove loose material first.
Don’t seal in an active leak
This is one of the biggest mistakes.
If water is still entering the wall, repainting only hides the evidence temporarily.
Find and correct the source first.
Don’t sand aggressively without considering the old paint
Older homes may contain coatings that require special handling.
If you are unsure about the age or composition of an existing paint layer, get appropriate advice before creating dust through extensive sanding.
Don’t use heat to force the paint to dry
A fan may help air movement in suitable conditions, but aggressively heating a freshly painted surface is not a good substitute for following the product’s drying instructions.
When Bubbling Paint Means You Should Stop DIY Repairs
Small, isolated paint bubbles are one thing.
Repeated or widespread damage is different.
Consider getting professional help when:
- the wall remains damp
- drywall feels soft or swollen
- bubbling keeps returning after repair
- there is a suspected plumbing leak
- water is entering from outside
- a ceiling has active water damage
- several rooms are developing similar problems
- you notice significant mold or persistent musty odors
- a large area of the wall has separated
- you are unsure about an older paint coating
A professional can investigate the source rather than simply treating the visible paint damage.
How to Prevent Paint Bubbles After Repainting
Good preparation is usually easier than repairing failed paint later.
Before repainting, make sure the surface is clean, sound, dry, and suitable for the coating you plan to use.
Remove loose paint.
Repair damaged areas.
Clean away dust and residue.
Prepare glossy surfaces as required by the paint manufacturer.
Prime bare or repaired surfaces when appropriate.
Keep the room within the environmental conditions recommended on the paint label.
In bathrooms and other humid areas, also pay attention to ventilation. A good exhaust fan or adequate ventilation can reduce persistent humidity, although ventilation cannot solve a hidden plumbing or building leak.
A Quick Decision Guide
If you find bubbling paint, use this sequence:
Bubble + damp surface: investigate moisture first.
Bubble + dry surface + loose old paint: remove the failed coating and inspect the old layers.
Bubble + dry surface + recently painted wall: review surface preparation and drying conditions.
Bubble around a window or plumbing area: investigate possible water entry.
Small isolated bubble with a completely dry, sound wall: remove the failed paint, repair the surface, prime if appropriate, and repaint.
Recurring or widespread bubbling: look beyond the paint and consider professional inspection.
This approach helps prevent the common mistake of treating every paint bubble in exactly the same way.
Frequently Asked Questions
Can I paint directly over a paint bubble?
It is better not to. A bubble indicates that the existing coating has lost adhesion. Remove the loose material, inspect the surface underneath, correct any underlying problem, and prepare the area before repainting.
Does bubbling paint always mean there is a water leak?
No. Moisture is an important possible cause, but bubbling can also result from poor preparation, contamination, unsuitable drying conditions, or problems between paint layers.
Why does paint bubble after I repaint a wall?
If bubbling appears soon after repainting, inspect the preparation and drying conditions first. The old surface may have been dirty, glossy, loose, damp, or otherwise unsuitable for the new coating.
Should I remove every bit of paint from the wall?
Not necessarily. For a small repair, you generally need to remove paint that is loose or poorly bonded while leaving sound coating in place. The amount of removal depends on the condition of the surrounding surface.
Can humidity cause paint to bubble?
Persistent high humidity can contribute to paint failure, particularly in poorly ventilated rooms. However, recurring bubbling should not automatically be blamed on humidity. Check for leaks, condensation, and other moisture sources.
Why does bubbling paint keep coming back in the same place?
Repeated failure in one location is a reason to investigate the underlying surface. Moisture intrusion, a plumbing problem, condensation, or another unresolved condition may be causing the paint to fail repeatedly.
Is bubbling paint dangerous?
The bubble itself is usually a finish problem, but the reason behind it may require attention. Persistent moisture can damage wall materials, and older paint may require special precautions when disturbed. If you are unsure what is causing the problem, investigate before scraping or sanding extensively.
Final Thoughts
Paint bubbles are easy to dismiss as a simple cosmetic problem, but the right repair depends on what caused the paint to lose its bond in the first place.
Start with the location. Check whether the wall is dry. Look underneath the damaged coating. Think about what happened before the bubbles appeared.
If the surface is dry and the problem is limited to a small area, removing the loose paint, repairing the surface, priming where appropriate, and repainting can often restore the finish.
If moisture is present, the bubbles keep returning, or a large section of the wall is affected, don’t keep covering the damage with new paint. Find the underlying cause first.
A good paint repair is not simply about making the wall look smooth again. It is about making sure the new finish has a sound surface to stay attached to.